How to Choose the Correct Size Protective Manual Call Point Cover?
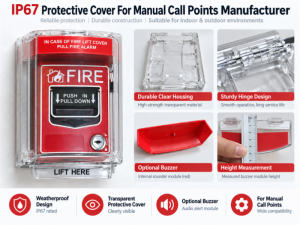
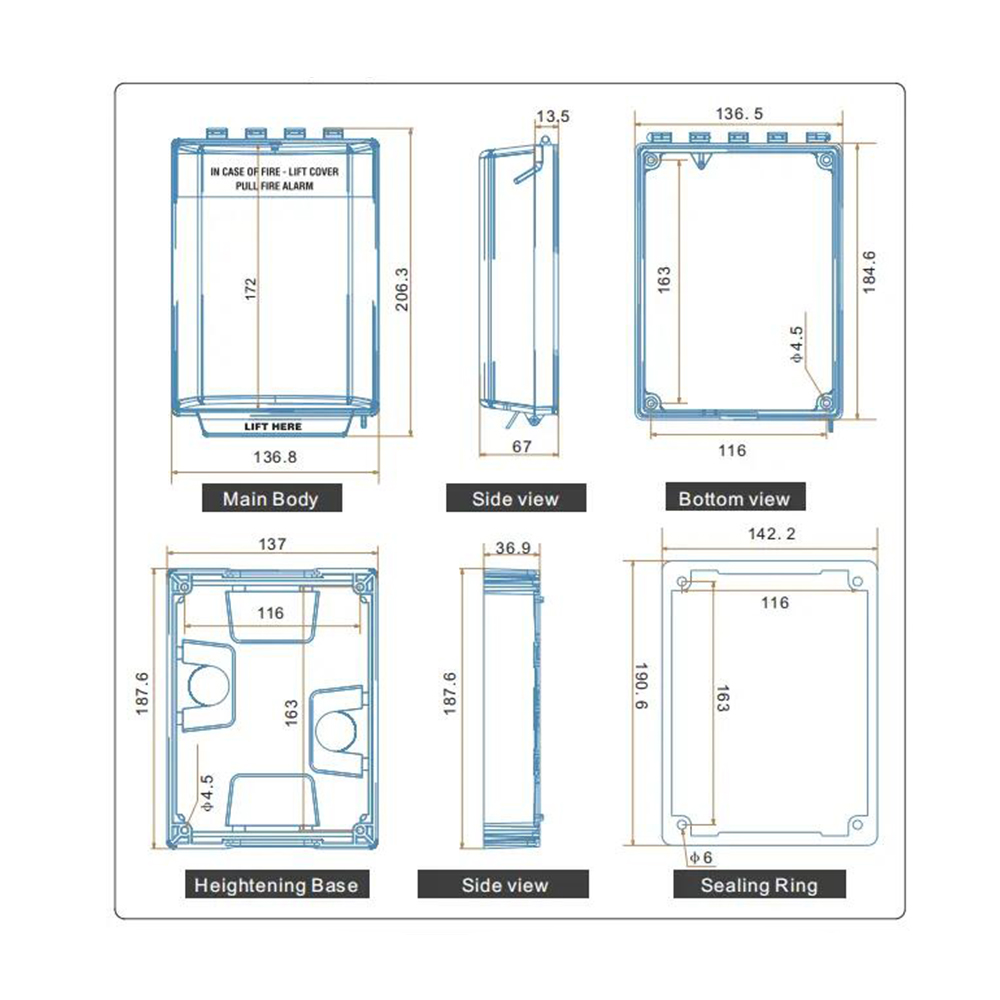
The correct manual call point cover size is determined by the installed call point’s width, height, projection depth, mounting box, cable entry, and the usable internal space of the protective cover.
A protective cover can look large enough in a product photo and still fail during installation.
Why?
Because a manual call point is not flat.
Its front face may be compact, but the installed unit can include a surface box, spacer, conduit, cable gland, waterproof fitting, or mounting plate. All these parts affect the real manual call point cover size required for a project.
For one installation, getting the size wrong is frustrating. For a distributor buying 300 or 500 units, it can mean returns, project delays, and extra labor.
So, before choosing a manual call point cover, measure the complete installed device—not just what you see from the front.
What Size Manual Call Point Cover Do You Need?
Start with three dimensions:
Width × Height × Projection Depth
Then check four more installation details:
- Back box or spacer
- Cable or conduit entry
- Lid opening clearance
- Available wall space
The cover should provide enough usable internal space around the installed manual call point without touching the device or interfering with wiring.
That is the basic rule.
Now comes the part that matters most: measuring correctly.
How to Measure a Manual Call Point: 5-Step Measurement Guide
This section gives contractors, wholesalers, and project engineers a simple way to confirm the required manual call point cover size.
Step 1: Measure the Maximum Width
Measure from the furthest left edge to the furthest right edge of the installed device.
Do not measure only the operating window or button.
If the manual call point has a larger mounting plate, side cable fitting, or surface box, include it.
Record:
W = ______ mm
For unusual device shapes, use the widest point.
Step 2: Measure the Total Height
Measure from the highest point to the lowest point of the complete assembly.
Again, include the back box or mounting structure if it extends beyond the call point body.
Record:
H = ______ mm
This measurement helps determine whether the device will sit comfortably inside the protective frame.
Step 3: Measure the Projection Depth
Here is the measurement buyers most often miss.
Place the ruler or tape measure from the finished wall surface to the furthest point of the installed call point.
Record:
D = ______ mm
Do not measure the call point housing alone.
Include:
- Surface mounting box
- Waterproof back box
- Spacer
- Raised mounting plate
- Screw heads
- Cable fittings
A call point may look slim from the front but project much farther from the wall after installation. The original sizing logic also stresses that complete installed depth—not housing depth alone—should be checked.
For many real projects, depth decides whether the cover closes properly.
Step 4: Check Cable and Conduit Entry
Where do the wires enter?
Top?
Bottom?
Side?
Rear?
This small detail can change the correct manual call point cover size.
For example, a top-entry conduit may require extra space above the call point. A side cable gland can increase the total width. A waterproof fitting may also extend farther than expected.
Before confirming a cover, mark:
Cable entry: Top / Bottom / Side / Rear
Also take one front photo and one side photo.
Photos make compatibility checks much easier than dimensions alone.
Step 5: Add Usable Installation Clearance
Don’t choose a cover that fits like a tight shoe.
The manual call point needs working space around it.
Check that the cover can:
- Open without touching the device
- Close completely
- Avoid cable glands and conduit
- Leave labels visible
- Allow normal access to the call point
- Leave room for future inspection
There is no single clearance number that works for every manual call point cover. Cover geometry, hinge position, mounting structure, and device shape all differ.
The safer approach is to compare your measurements with the manufacturer’s usable internal dimensions.
Internal Dimensions vs. External Dimensions—Don’t Mix Them Up
This is another common purchasing mistake.
Suppose a cover is listed as:
200 × 140 × 70 mm
Are those external dimensions or internal dimensions?
They are not interchangeable.
Frames, hinges, seals, enclosure walls, and mounting structures reduce the usable space inside. Your source article correctly notes that a cover with a large outside dimension may still have less room available for the actual call point.
When comparing manual call point cover size, ask for:
| Item | What to Confirm |
|---|---|
| External width | Overall wall space |
| External height | Overall installation height |
| Internal width | Call point fit |
| Internal height | Call point fit |
| Internal depth | Installed projection |
| Opening area | Lid movement |
| Mounting holes | Installation compatibility |
If internal dimensions are unavailable, send the manufacturer your device drawing and installation photos before ordering.
Standard or Deeper Manual Call Point Cover?
Bigger is not automatically better.
A compact manual call point mounted close to the wall may only need a standard-depth cover.
A deeper manual call point protective cover may make more sense when the installation has:
- A thick surface box
- A raised base
- Waterproof fittings
- Conduit connections
- Additional wiring space
So instead of asking, “Which cover is the biggest?”, ask:
“Which cover provides enough internal clearance for my fully installed call point?”
That question leads to a much better engineering decision.
For projects where extra installation depth is needed, customized raised-base structures may also be considered rather than changing the entire call point layout.
Does an IP67 Manual Call Point Cover Need a Different Size Check?
Yes—and no.
The measurement method stays the same.
You still need width, height, projection depth, cable entry, and usable clearance.
However, outdoor and industrial projects often add fittings that indoor installations do not have. Waterproof glands, conduit, sealing hardware, and deeper surface boxes can increase the required space.
Also remember:
IP rating and physical fit are two separate checks.
A cover may meet the required environmental protection level and still be the wrong physical size.
For outdoor application planning, the existing Why Do Outdoor Fire Alarm Buttons Need an IP67 Call Point Cover?
What If You Don’t Know the Manual Call Point Model?
This happens frequently in retrofit projects.
A customer may send one site photo and say:
“We need a transparent cover for this button.”
Don’t guess.
Ask them to photograph the manual call point with a ruler or tape measure visible.
Request:
- Front photo with width
- Front photo with height
- Side photo showing projection depth
- Back box information
- Cable-entry direction
If the order quantity is large, checking a sample before mass purchasing is also sensible.
“Universal” compatibility does not mean measurements can be skipped.
Common Manual Call Point Cover Size Mistakes
Measuring only the front face:
Width and height look correct, but the device is too deep.
Ignoring the back box:
The call point fits. The complete assembly doesn’t.
Forgetting cable glands:
The cover interferes with side or top wiring.
Using external cover dimensions:
The enclosure looks large enough, but usable internal space is smaller.
Choosing the deepest cover automatically:
Extra depth can increase wall projection and may not suit restricted installation areas.
Bulk ordering without verification:
A small sizing error becomes a large project problem when multiplied across hundreds of units.
B2B Manual Call Point Cover Size Checklist
Before sending an RFQ, prepare:
Manual call point model: ______
Width: ______ mm
Height: ______ mm
Installed depth: ______ mm
Back box: Yes / No
Cable entry: Top / Bottom / Side / Rear
Indoor / Outdoor: ______
Required protection level: ______
Quantity: ______
Front and side photos: Attached / Not attached
For distributors working with several alarm brands, keeping this information in a standard form can speed up quotations and reduce compatibility questions.
For installation positioning after the correct cover has been selected, see IP67 Manual Call Point Cover Placement Guide
How Do You Make the Final Size Decision?
Think in this sequence:
Measure W × H × D → Include the back box → Check cable entry → Compare usable internal dimensions → Check opening clearance → Confirm environment → Test compatibility
That is a much safer method than choosing from a catalogue photo.
The correct manual call point cover size is not simply the smallest enclosure that fits around the front of the alarm button. It should accommodate the complete installed device while leaving enough space for wiring, mounting, operation, and maintenance.
For wholesalers, fire alarm contractors, and engineering project buyers, those few measurements can prevent a surprisingly expensive mistake.
Send the manufacturer the width, height, installed depth, front photo, side photo, mounting method, and cable-entry position before a large order.
Five minutes with a tape measure can save a lot of rework later.
FAQ
1. How do I determine the correct manual call point cover size?
Measure the complete installed width, height, and projection depth, then compare them with the cover’s usable internal dimensions.
2. Why is projection depth important?
Surface boxes, spacers, glands, and mounting hardware can make the installed call point much deeper than its front appearance suggests.
3. Should I use internal or external cover dimensions?
Use internal dimensions for compatibility. External dimensions are mainly useful for checking available wall space.
4. Should the protective cover touch the call point?
No. Leave enough clearance for the lid, wiring, labels, fittings, and normal operation.
5. Can one manual call point cover fit several brands?
It may fit several devices when their installed dimensions and mounting layouts fall within the cover’s usable space.
6. Do outdoor manual call points need deeper covers?
Not always, but outdoor installations may include glands, conduit, sealing hardware, or deeper back boxes that require additional space.
7. What should I send a supplier before ordering?
Send W × H × D measurements, front and side photos, back-box details, cable-entry direction, installation environment, and quantity.
8. Should I test a cover before a bulk order?
For an unfamiliar device or a large engineering order, a sample compatibility check can reduce the risk of installation problems.
Conclusion
Choosing the correct manual call point cover size is not difficult—but guessing can be costly.
Before placing an order, confirm the width, height, projection depth, back box, cable entry, and usable internal clearance. For outdoor or industrial projects, also check whether an IP67 manual call point cover matches the required installation environment.
For wholesalers, contractors, and engineering buyers, one simple rule can prevent most sizing problems:
Measure the installed device first. Confirm compatibility second. Order in bulk third.
Not sure which protective cover fits your manual call point?
Send us your call point model, W × H × D dimensions, front and side photos, installation method, and required quantity. Our team can help review the fitting requirements and recommend a suitable standard or customized protective cover.
Have a special back box, deeper installation, cable-entry requirement, or custom project? Contact Sumring to discuss your OEM/ODM manual call point cover solution.